A hysterectomy—whether partial or total—is a major surgery and a profound physical shift. You’ve had organs removed, which means the foundational support system in your pelvis has been significantly disrupted.
If you are thinking: “Am I going to leak? Will my other organs fall down? What exercises can I even do?” you are not alone. These are the most common anxieties women face during recovery.
Your pelvic floor is a critical layer of muscles and connective tissue that acts like a hammock supporting your bladder, bowel, and, previously, your uterus. After a hysterectomy, this hammock needs dedicated, gentle attention to heal the surgical site, rebuild support, and prevent future issues like pelvic organ prolapse (when organs drop down due to weak support).
This article will give you the clear, safe roadmap you need: the exact timing for starting exercises, what to avoid, and five essential moves—from simple Kegels to core stabilizers—that will empower you to regain control and strength.
The Critical Rule: Respect the Healing Time
The most important step is patience. Starting any intense exercise too soon can strain your internal stitches and compromise your long-term recovery.
The First 6 Weeks (The “No-Go” Zone)
This phase is about healing. Do NOT perform any dedicated Kegel exercises, heavy lifting (over 10 lbs), or intense core work. Your doctor will advise you to focus only on walking and gentle movement. The goal is rest.
The 6- to 8-Week Mark
This is typically when your surgeon gives you the “all clear” to resume normal activity. This is the green light to begin your gentle pelvic floor exercises. If you feel pain or pulling, wait another week.
Always get specific clearance from your surgeon or Physical Therapist before starting any exercise program after surgery.
5 Essential Pelvic Floor Exercises (Beyond the Kegel)
The key to a strong post-hysterectomy pelvic floor is learning to use the deep core muscles (like your transverse abdominis) alongside your pelvic floor muscles.
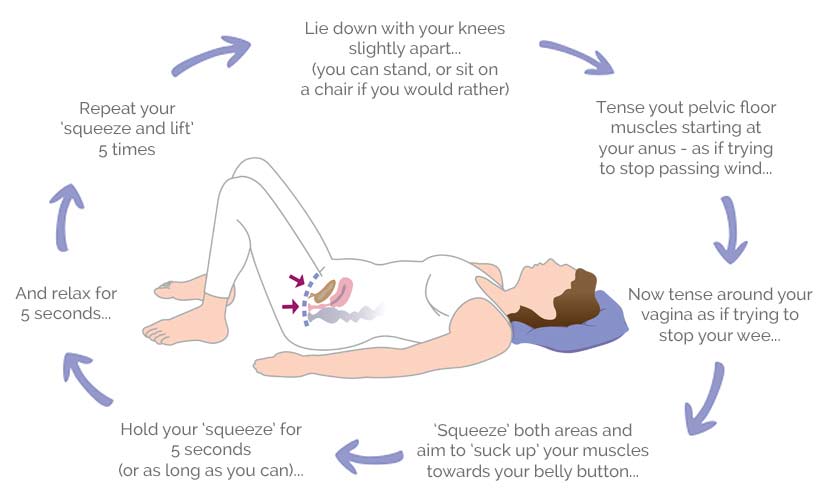
1. The Classic Kegel (The Right Way)
Most women do Kegels incorrectly, relying on glutes or abs. A correct Kegel isolates the pelvic floor.
Action: Imagine you are trying to stop the flow of urine and stop passing gas simultaneously. Lift and squeeze the muscles upward and inward toward your belly button.
Avoid: Squeezing your glutes, holding your breath, or bearing down.
Practice: Start with 5 slow holds (5-second squeeze, 5-second release) and 5 quick flicks (1-second squeeze, 1-second release). Repeat 3 times a day.
2. The Belly Breath (Restoring Core Connection)
This exercise focuses on the relationship between your breath and your deep core, which is essential after abdominal surgery.
Position: Lie on your back with knees bent and feet flat. Place one hand gently on your lower belly.
Action: Inhale deeply, allowing your belly and ribs to expand gently. As you exhale, gently draw your belly button in toward your spine and simultaneously perform a very soft Kegel contraction.
Practice: 10 breaths, focusing on relaxing the pelvic floor completely on the inhale.
3. Transverse Abdominis Activation (The Deep Core Hug)
The Transverse Abdominis (TA) is your body’s natural internal corset. Strengthening it protects your abdomen and supports your pelvis.
Position: Lie on your back with knees bent.
Action: Place two fingers just inside your hip bones. Gently try to draw your hip bones closer together (as if zipping up a tight pair of jeans). You should feel the muscle under your fingers tighten slightly. Do not flatten your back or move your hips. This is a very subtle contraction.
Practice: Hold the gentle contraction for 5 seconds, then release. Repeat 10 times.
4. Bridge with Pelvic Floor Lift
This exercise strengthens the glutes (another major pelvic support system) while integrating the Kegel.
Position: Lie on your back, knees bent, feet flat.
Action: As you exhale, engage a gentle Kegel and lift your hips a few inches off the floor (a mini-bridge). Inhale and gently lower back down.
Practice: 10 repetitions, ensuring the Kegel contraction initiates the lift and the breath coordinates with the movement.
5. Bird-Dog (Full-Body Stability)
Once you’ve mastered the previous four, the Bird-Dog challenges your stability and core control, preparing you for more dynamic movements.
Position: Start on your hands and knees (tabletop), ensuring your spine is neutral.
Action: As you exhale, gently draw in your belly (TA activation) and slowly extend one arm forward and the opposite leg back, keeping your hips perfectly level. The goal is stability, not height.
Practice: 5 repetitions on each side.
Beyond Exercise: Lifestyle Habits That Prevent Prolapse
Exercise is only one piece of the puzzle. Prolapse risk is significantly increased by chronic, downward pressure on the healing pelvic floor.
Tackle Constipation:
Straining on the toilet creates immense downward pressure. Ensure your diet is rich in fiber and water. Consider using a small footstool (like a Squatty Potty) to optimize your posture for easier bowel movements.
Mind Your Heavy Lifting:
Always engage your core and pelvic floor before lifting anything heavy (your child, a grocery bag). Exhale as you lift, never hold your breath and strain.
Get a Referral to a Pelvic Floor PT:
If you are unsure if you are doing the exercises correctly, or if you feel any pain or pressure, a Pelvic Floor Physical Therapist (PT) is a specialist who can provide personalized guidance, check your technique, and create a custom recovery plan. This is an invaluable step for long-term health.
Reclaiming strength after a hysterectomy is a marathon, not a sprint. Be patient, be consistent, and trust that with these essential exercises, you are actively building a stronger, more supported future for your body.